 The Bound Leaf
Understand a Book’s Anatomy
Before you sew a notebook or assess an old binding, it helps to know what you are looking at. A book has a structure, and each part has a job. This first lesson gives you the vocabulary we will use throughout The Bound Leaf’s bookbinding and book care series.
We will use a typical hardback as our starting point. Books vary: a modern glued paperback, a sewn journal and an early leather binding will not contain exactly the same parts. Learn to describe what you can see without assuming what is hidden.
1. Start with the outside
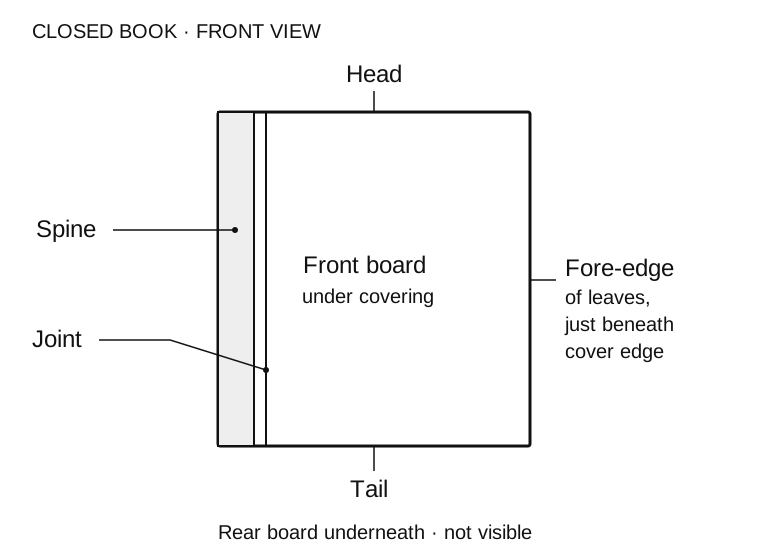
Place the closed book with its front cover uppermost and the spine to your left. The first diagram shows this familiar view. These positional names remain the same when you turn the book around.
- Boards
- The stiff supports inside a hardback’s front and back covers. They protect the pages and are usually covered with cloth, paper, leather or a combination of materials. A paperback has flexible covers instead.
- Spine
- The bound edge of the book. Distinguish the visible spine covering from the spine of the text block beneath it: they are not necessarily stuck together along their whole length.
- Head and tail
- The top and bottom of the book respectively. You may also see “foot” used for the bottom.
- Fore-edge
- The exposed edge of the leaves opposite the spine. It is the edge you normally part when opening a book.
- Joint
- The outside junction where a board meets the spine area and the cover flexes. A groove here can be an intentional part of the construction; it is not automatically a split.
- Dust jacket
- The removable wrapper fitted around some books. Its flaps turn inside the covers. It is separate from the binding, so describe damage to the jacket separately from damage to the book.
2. Look inside the covers
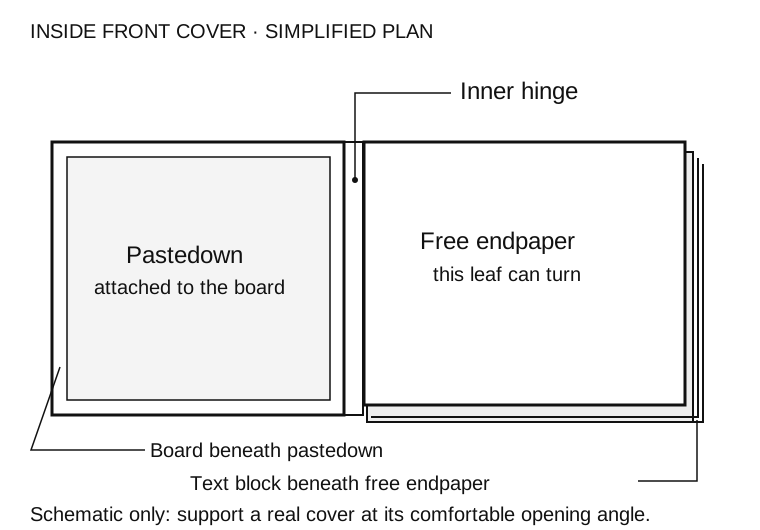
Support the front board as you open it gently. Stop at the angle the binding comfortably allows; do not press it flat for this exercise. Inside many hardbacks you will find endpapers: leaves between the covers and the main body of the book.
- Pastedown
- The endpaper leaf attached to the inside of the board. It hides much of the board’s inner surface and the edges of the covering material turned over it.
- Free endpaper
- The endpaper leaf that turns freely beside the pastedown. Endpapers can be plain, patterned, marbled or printed; some carry maps or information belonging to the book.
- Hinge
- In this series, the inside junction between the board and the text block. Other guides sometimes use “hinge” and “joint” differently; we will use hinge inside, joint outside to keep descriptions clear.
- Text block
- The main body of leaves containing the book’s text and illustrations. Binding descriptions sometimes use “book block” for the assembled body including its endpapers.
Endpapers help protect the first and last text leaves and, in many bindings, help connect the covers to the text block. That connection may also involve sewing supports and spine-lining material. Never pull at an endpaper to find out how it is attached.
3. Understand pages, leaves and sections
A leaf is one physical piece of paper in the book. A page is one side of that leaf. One leaf therefore has two pages, even if one or both sides are blank or unnumbered.
The front of a leaf is its recto; the back is its verso. In a conventionally arranged English-language book, rectos appear on the right of an opening and versos on the left. Printed page numbers can help, but they are not the definition.
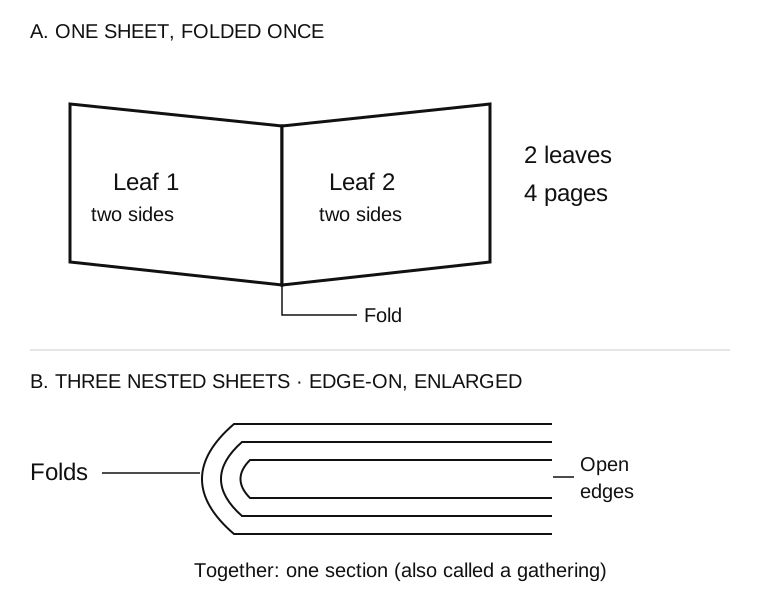
Fold a sheet once and you have two leaves, providing four pages. Nest several folded sheets together and you have a section, also called a gathering. Many craft tutorials call this a signature; in bibliography, “signature” can also mean the letter or mark used to identify a gathering.
A sewn book can contain one section or many sections joined with thread. Other books have individual leaves secured with adhesive. A hard cover alone does not prove that a book is sewn, and visible glue does not prove that it is unsewn: sewn books may also have glued spine linings.
The gutter is the inner margin area beside the binding between facing pages. It is not the same thing as the hinge inside the cover. An illustration that disappears into the gutter is disappearing towards the centre of the opening.
4. Notice the smaller details
You do not need to memorise every specialist term today. These are the extra features most likely to appear in our later tutorials.
- Headband and tailband
- Small bands at the head and tail of the text-block spine, collectively called endbands. Some are sewn as part of a binding; many modern examples are ready-made strips attached for appearance. A visible band does not prove hand sewing.
- Squares
- The small projections of the boards beyond the text block at the head, tail and fore-edge. Not every binding has them.
- Turn-ins
- The margins of cloth, leather or paper folded over the edges of the boards and secured inside. Much of this material is usually covered by the pastedown.
- Spine linings
- Paper or fabric attached over the text-block spine to help support its structure. Open-weave lining cloth is often called mull or super. These materials are normally hidden; leave them undisturbed.
- Raised bands
- Ridges across some leather spines. They may reflect underlying sewing supports or may be decorative, so their presence alone cannot establish the construction or age.
5. Why these names matter
“The cover is broken” leaves a great deal uncertain. “The front inner hinge paper is split, but the board remains attached” describes both the location and what you have observed. “The dust jacket is torn at the head of the spine” identifies a different problem altogether.
Accurate language helps you follow instructions, keep useful condition notes and explain a problem to a bookseller or conservator. It also prevents an easy mistake: treating every visible gap, groove or flexible area as damage.
Try it yourself: a five-minute book inspection
- With the book closed, point to the head, tail, spine, fore-edge and front board.
- Find the front joint on the outside. Open the cover only as far as it moves comfortably and find the inner hinge.
- Identify the pastedown and free endpaper. Notice any pattern, inscription or bookplate without attempting to remove it.
- Turn one sound leaf gently by its outer edge. Identify its two pages, then find the gutter of the opening.
- Look for an endband and the board squares. If either is absent, simply record that.
- Write one sentence describing the book using at least four of the terms you have learned.
The five distinctions to remember
- Board and jacket: the stiff cover support and the removable wrapper.
- Joint and hinge: outside and inside, using our series terminology.
- Pastedown and free endpaper: one is attached to the board; the other turns.
- Leaf and page: one piece of paper, two sides.
- Section and text block: a folded group and the book’s main body of leaves.
Next in our weekly sequence: Carry Out a Basic Book Condition Check. You will use this vocabulary to record what is sound, what is worn and what needs closer attention. Meanwhile, the existing guides below offer a practical next step.
For an accessible introduction, see Princeton Public Library’s Book anatomy. For specialist terminology, consult Matt T. Roberts and Don Etherington’s Bookbinding and the Conservation of Books: A Dictionary of Descriptive Terminology, including its endpapers entry. Terminology varies between binding traditions; this lesson states the conventions used in our series.
Diagrams: original simplified teaching schematics for The Bound Leaf.